Tips & Tricks
We all come across useful tips and tricks when we are with our quilting buddies; some have been passed down from our Mothers or Grandmothers, and still others are to be found in quilting magazines and occasionally there are those we came up with ourselves!
Here is a collection that JQ hopes you will find handy. If you have any that you would like to share, please click here to email them for inclusion on this page. If you would like to be given the credit, let JQ know your name and where you are from, for example; Helen, Phoenix, AZ.
New Tip!
Hammer Those Bumps!
When making blocks where several pieces come together at one point, like a Star or Stack and Whack, a bump can form at the center even if you've pressed really well or have even pressed the seams open. When quilting this can cause your presser foot to be knocked off course and spoil your quilting pattern. Before loading your quilt top onto the quilting frame (or making a quilt sandwich if it's a smaller quilt) turn the quilt top so that you are looking at the wrong side of the fabric, place on a hard surface and hammer the lump! It will flatten considerably! JQ Photo Fabulous
When you are trying to decide on the arrangement of a stack of blocks, arrange the blocks on your design wall or floor, then take a digital photo. Rearrange the blocks and take another photo. Repeat until all the possibilities are exhausted. Compare the photos to see which design is your preference and then use that photo as a guide during the quilt top construction. JQ |
| |
Just As Good As New Tips!
 | Travelling Fabric Reference
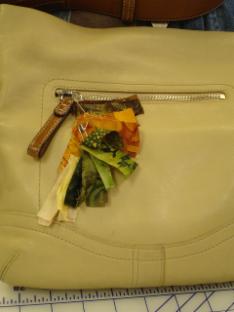
Safety pin together scraps of fabric from the collection you are putting together for your next or latest quilt project. You can have more than one safety pin; each one for a 'family' of colors. Pin to your purse zipper, so if you happen across a quilt shop on your travels, you can accurately use these scraps to compare with new fabrics to add to the collection. Thanks to Trisha, Lake Arrowhead, CA | | Travelling Projects
Use a new pool noodle to wrap up projects on the go!
Have your pieces laid out on a section of muslin or backing fabric, place the pool noodle at one edge and roll up the project with the noodle inside. Fasten the loose end with a couple of pins stuck straight into the noodle. Thanks to Cheri, Morgan Hill, CA |
Tangling or Snapping Thread? Try this...
If you are struggling with monofilament or other fine threads tangling or snapping, one trick that oftern works is to increase the length of the thread path. In other words put the thread further away from the machine which enables the thread to un-wind, unkink and relax before passing through the machine tension discs. Putting the thread on the floor (in a jam jar) can help, but the thread may need a little guidance over the edge of your machine by attaching a piece of sticky velcro - the 'hook' side - to where the thread touches your machine. Thanks to Lisa, Morgan Hill, CA | Turning Skinny Tubes / Apron Strings / Handles
Have you ever made skinny apron strings or bag handles that are stitched right sides together and then you struggle to turn them inside out? No more!
Place a piece of string or a thin ribbon between the two layers (close to the fold) before you begin sewing. The ribbon should be just long enough to poke a little out of both ends of your strip. As you sew across one short edge, make sure you catch the end of the ribbon and indeed make one or two lockstitches to make secure. Stitch all the way down the long edge as usual, taking care not to catch the string or ribbon in the stitching, but don't sew over the other short edge. Clip the corners to within 1/8" to reduce bulk. Start to turn the sewn short end inside where the ribbon is stitched and poke in with your finger or the blunt end of a pencil. Grasp the loose end of the ribbon at the other end of your strip. Pull the ribbon and at the same time pull the strip in the opposite direction. Hey presto your handle or apron string is turned in a flash!
You can choose to snip off or tear out the ribbon where it was stitched. Press, possibly topstitch and the strap or handle is ready to use in your project. Thanks to Lisa, Morgan Hill, CA | | |
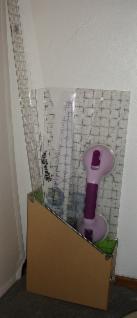
Handy Rulers (Part1)
If you are finding your long ruler collection a little, er, unruly (pardon the pun!) then prop the rulers up in a magazine box near at hand to your cutting table. I keep mine on the floor in a corner (to support the very long rulers) and it is right beside my cutting table for ease of access.
| 
|
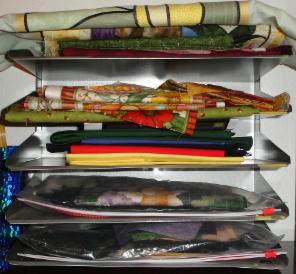
| Handy Rulers (Part 2)
Use a document organiser to hold smaller rulers and hard plastic templates. Here's a picture of mine which even has small drawers; useful for spare blades, tape measure storage and other small items. This one has multiple depths which means my smaller rulers and templates don't vanish into the depths and are always at hand. | 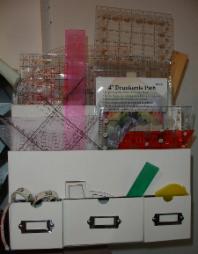
|
|
Non-Slip Presser Foot
Stop your foot peddle creeping across the floor by glueing or taping a piece of non-slip matting or webbing underneath. | Starch Stable Bias
A little spray starch when pressing can help to avoid stretching the raw edge of pieces cut on the bias (diagonal). |
| Light Box
Tape appliqué patterns to an easily accessible window as a good substitute for a light box. | Catching Scraps
Tape a small bag to the edge of your sewing table within easy reach for cut off threads and other small waste items. |
|
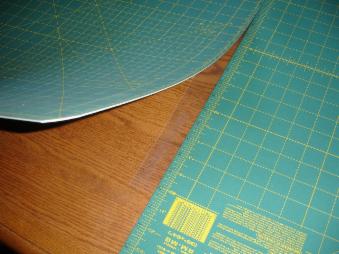 | A Bigger Cutting Space
If you have two self healing cutting mats and you would like to create a larger cutting area here's a handy solution to keep them from constantly shifting apart. Cut a long strip of template plastic which is at least 3" wide then attach strips of double sided tape to the plastic, about half an inch in from both long sides. Place the plastic tape side uppermost onto your table and line up one mat edge so that it sticks to the double sided tape and reaches to about half way across the plastic. Then carefully line up and lay the second mat so that it covers the other half of the plastic and sticks to the remaining tape; try to butt the two boards as close as possible and line up the grid if you can. If there is a gap, when cutting fabric over the gap you may find the odd thread doesn't cut, so simply move it a little and trim carefully. Press on the mat over the tape with the heel of your hand to ensure adhesion. The beauty of this technique is that you can carefully peel either board off to take to classes or sew days and smooth it right back into place when you return. |
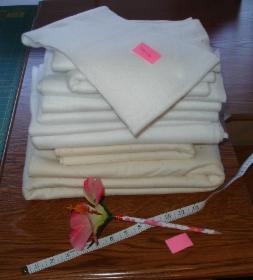
| Batting Around
Are you frustrated with repeatedly sorting through your stash of batting pieces when you need a specific size for a smaller project?
Take a few minutes to measure each piece and then write the measurement on a small sticky note and tuck this inside the first fold so that you can quickly find the size you need.
Quicker still, use a piece of scotch tape on the folded edge of the pieces and store in a clear plastic bin so that you can see the sizes of each
piece at a single glance without even opening the box! |
|  | Project Trays
Upcycle an old paper filing tray to organise your current projects ~ if you're anything like me, you have several on the go at once! |
|
Turning Scrap Strips Into Useful Leaders
When cutting, save any waste strips (ideally min 1/2" wide, but any length) for use as 'leaders'. When handling small or tricky pieces, start off by stitching across the width of the leader first, and then follow on with your pieces. This helps prevent fabric from being dragged into the bobbin hole by the needle, plus if a 'birds nest' occurs, it will be on your scrap leader, not your precious pieces! :-) | Used Dryer Sheets to Foundation Patterns
'Upcycle' your used dryer sheets! Press them flat and use them for foundation piecing. Trace a design onto them with a water soluble pen so that when the quilt is washed, any markings that happen to show through will disappear. Depending on the brand you use, most are perfect for one half of up to a 7.5" block, or tacking several together (you could use water soluble or other fine thread) gives you a long strip. |
Avoiding Color Run Woes
Wash together any fabrics you plan to use in one quilt, before you start. Better to find out that the colors may run before you spend hours piecing and quilting! In addition, fabrics from different manufacturers (and sometimes even from the same!) tend to shrink at slightly different rates and so prewashing avoids a distorted quilt! | Eco-Friendly Disposal of Scrap Fabric / Batting
Throw cotton fabric and batting into your composter
rather than adding to a landfill.
If you have a worm farm, only add organic batting or organic
fabric dyed with natural vegetable dyes. The smaller the pieces are,
the faster they will break down.
Better still, repurpose those scraps and use them to stuff pillows etc! |
|  
Chain Piece 'Snipper'
Use those unwanted promotional letter openers to cut the threads between chain stitched pieces after transporting them to your ironing board. | No-Cost Stylus
Cut 6" off a wooden kebob/BBQ stick and whittle the non-pointed end to a flat 'blade', like a screwdriver. This makes for an almost no-cost stylus for use
when sewing tricky pieces together.
You then have both a flat blade end and a pointy end for multi-use.
A wooden stylus gives better grip on the fabric than a plastic one.
Use a stylus to gently push the top fabric of two pieces under the presser foot
to ease and straighten awkward pieces as you sew without putting your fingers at risk! |
| Gotta Tip? Send it here! |
| | |
| |